Classic Chocolate and Vanilla Cookies Recipe37 mins
A detailed guide to baking soft, cake-like rounds finished with a perfectly smooth, half-chocolate, half-vanilla glazed top.
This classic chocolate and vanilla cookies recipe produces an incredibly tender, cake-like cookie base finished with a perfectly split, glossy half-and-half icing. By focusing on a highly hydrated sponge-style dough, the rounds maintain a soft, melt-in-your-mouth interior that balances the sweet dual toppings beautifully.
Mastering the Cake-Like Crumb of This Chocolate and Vanilla Cookies Recipe
Home bakers frequently wonder why this classic treat behaves differently than a traditional crispy biscuit. When you cream real room-temperature unsalted butter with granulated white sugar and incorporate an extra egg along with whole milk, you create a stable, highly aerated batter that rises into a soft, cloud-like sponge inside the oven.
If you love serving beautifully colorful, soft desserts alongside your traditional bakery favorites, you should also take a look at our vibrant easy strawberry lemon cookies recipe or try the refreshing, bright profile of our popular fresh lemon raspberry cookies recipe to enhance your weekend dessert display.
The Golden Glazing Rule for This Chocolate and Vanilla Cookies Recipe
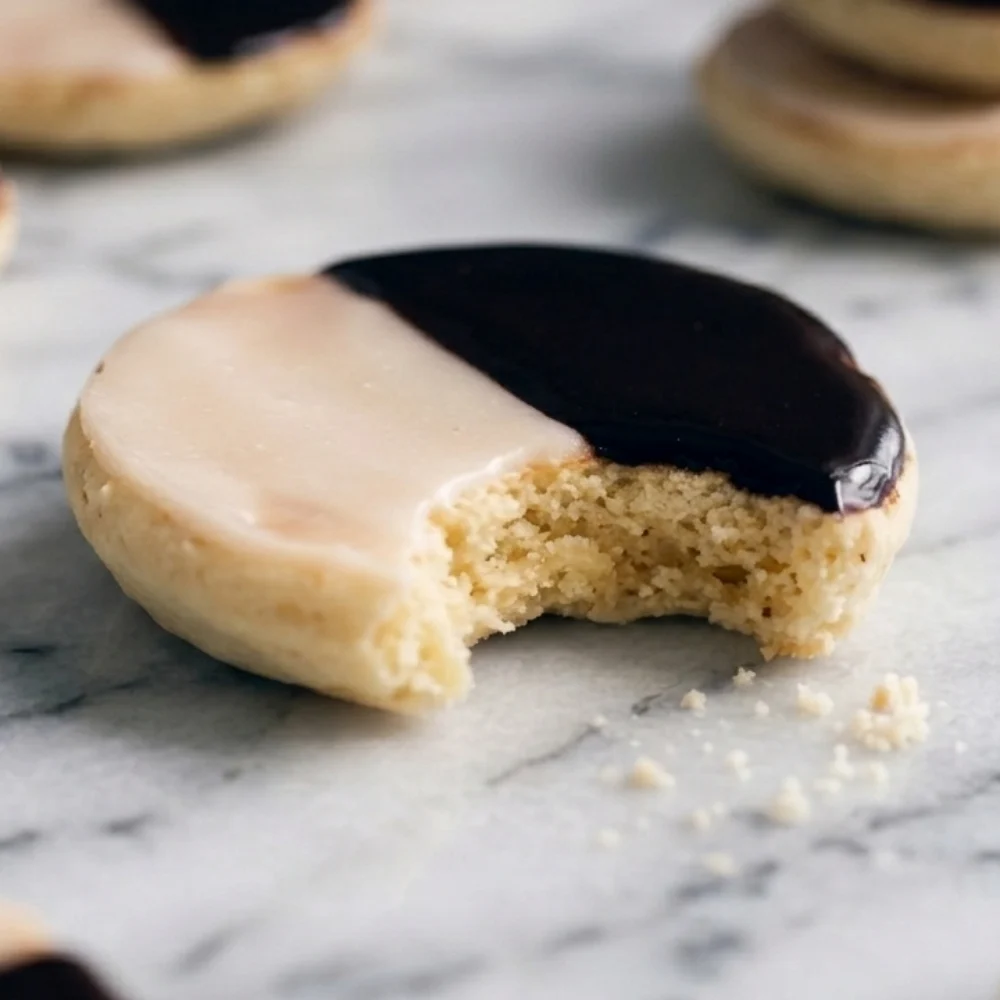
The most defining feature of this iconic dessert is the perfectly straight, clean dividing line right down the center of the surface. For a simpler, pure citrus base that skips the dual glaze assembly completely, you can always explore our traditional soft lemon cookies recipe to perfect your baseline dough hydration techniques.
Ingredients for Your Chocolate and Vanilla Cookies Recipe
The ingredient framework for this dual-flavored treat combines everyday baking necessities with rich cocoa elements to create a gorgeous visual contrast. If you enjoy experimenting with unique, deep fruit sugars and rich molasses undertones, you might also like to check out our flavorful chewydate cookies recipe for another incredible sweet option.
- Butter: Use 1/2 cup/approx. 115g of softened unsalted butter to create a rich, melt-in-your-mouth crumb base.
- Sugar: You need 1 cup/approx. 200g of white granulated sugar to preserve core moisture and softness.
- Eggs: Use 2 large room-temperature eggs to build the necessary sponge lift and airy texture.
- Milk: Measure 1/3 cup of whole milk to keep the thick cookie batter perfectly hydrated.
- Flour: Measure 2 cups/approx. 250g of all-purpose flour to provide a stable, cake-like structure.
- Powdered Sugar: Use 3 cups/approx. 360g of confectioners’ sugar to build a smooth, high-gloss glaze base.
- Cocoa Powder: Prepare 3 tablespoons/approx. 22g of premium cocoa powder to finish your dark icing half.
Technical Steps for This Chocolate and Vanilla Cookies Recipe
- Step 1Cream the Fluffy Foundation
Preheat your baking oven to 350°F/approx. 175°C and line a large baking sheet with plain parchment paper. In a large bowl, beat your room-temperature unsalted butter and white granulated sugar together for three full minutes until light, pale, and fluffy.
- Step 2Build the Sponge Batter
Beat in your eggs one at a time, followed by your pure vanilla extract. Alternately add your dry ingredients (flour, baking powder, salt) and your whole milk into the wet mixture, stirring gently with a soft spatula just until a thick, cake-like batter forms.
- Step 3Scoop, Shape, and Bake Your Chocolate and Vanilla Cookies Recipe Rounds
Drop uniform mounds of the thick batter onto your prepared baking sheet using a cookie scoop, leaving plenty of space between each round. Dampen your fingertips slightly with water and gently press down on the tops of the mounds to smooth and flatten them into even disks. Bake for ten to twelve minutes until the edges are completely set and the tops spring back lightly when touched, keeping the surfaces pale. Let them cool completely before beginning the final decoration stage.
Managing the precise viscosity of your batter determines the entire success of this chocolate and vanilla cookies recipe. This specialized dough falls right between a traditional cookie dough and a structured cupcake batter. If your room-temperature butter or whole milk is added carelessly without proper cream time, the batter will fail to trap air molecules, causing your cookies to bake up heavy, dense, and flat. By maintaining a slow, methodical folding pattern when integrating the all-purpose flour and dairy liquids alternately, you develop a stable starch network that traps expanding steam bubbles smoothly inside the hot oven. This precise structure is what allows the cookies to rise into beautiful, pillowy mounds that retain their signature softness over time.
The selection of your baking pan and insulation layout plays a major role during the thermal expansion stage of this chocolate and vanilla cookies recipe. A heavy-gauge, reflective aluminum baking sheet is highly recommended because it absorbs and distributes heat uniformly without creating sharp hot spots. Avoid using dark or thin metal sheets that overheat rapidly, as they will scorch the bottom crust of your sponge cookies while leaving the inner core raw and sticky. Lining your pan with high-quality silicone mats or heavy kitchen parchment paper creates an essential insulation barrier. This protection allows the bottom of each round to bake into a smooth, flat, golden-white surface that serves as the perfect smooth canvas for your dual icing application later.
When you prepare to shape the portions for this chocolate and vanilla cookies recipe, using a mechanical spring-loaded scoop ensures that every piece contains the exact same mass. Uniformity in size means that every single round on your tray will reach perfect doneness at the exact same second in the oven. Space your raw batter mounds at least two inches apart on your lined pan to allow for proper air movement during the expansion phase. As the hot oven air circulates around each cookie, it creates a gentle, stable matte outer edge while keeping the internal crumb wonderfully cloud-like and tender. Remember to flatten the tops gently with slightly damp fingers to guarantee your baked bases have level bottoms for easy glazing.
Timing and close visual monitoring through your oven window are essential when baking the chocolate and vanilla cookies recipe to prevent the delicate sponge from drying out. Unlike traditional chocolate chip varieties that require deep golden browning, these cake-like cookies must remain pale, soft, and elegant. Set your timer strictly for ten minutes and check the texture immediately. The outer rim should appear dry and completely set, while the very center should feel soft but spring back gently when pressed with a clean finger. Remove the tray from the hot rack while the cookies are delicate, and let them rest quietly on the hot pan for five full minutes to finish their residual cooking safely on your kitchen counter.
Transferring your baked rounds onto an open-wire cooling rack at the correct moment preserves the delicate interior crumb structure of your chocolate and vanilla cookies recipe. Leaving hot treats on a solid metal baking pan for too long allows trapped bottom heat to continue drying out the base, turning a soft sponge tough. Use a thin metal spatula to lift each piece carefully, flipping them upside down onto the wire rack so the completely flat bottom surface faces upward to cool. This setup allows fresh air to move freely beneath the bakes, preventing steam condensation from building up and making your bottom surfaces soggy before the decoration step begins.
Preparing your decorating workspace for the half-and-half icing stage of this chocolate and vanilla cookies recipe ensures a flawless, professional finish. While your baked rounds are cooling down to absolute room temperature, clear your counter space and lay down a large sheet of clean parchment paper directly underneath your wire cooling rack. This simple setup catches any stray drips of sweet white or dark glaze, keeping your kitchen cleanup incredibly fast and effortless. Taking a disciplined, orderly approach to every single step—from batter hydration to cooling cycles—guarantees a magnificent visual result that beautifully showcases the classic bakery style.
If you want to practice your dough shaping skills with a traditional, rich sweet that relies on solid butter fats rather than a cake batter approach, try our classic best ever chocolate chip cookies recipe to build your foundational kitchen skills. Alternatively, if you prefer deep fruit profiles paired with subtle nut aromas for your next family gathering, look over our gorgeous best ever almond cherry cookies recipe or try our beautiful, crimson easy red velvet cookies recipe to create a spectacular variety of colors on your dessert table.
Ultimately, mastering these simple thermal controls and glaze setting times gives you total confidence when executing this iconic recipe. The beautiful visual contrast of a glossy white vanilla icing resting right alongside a deep, rich chocolate glaze is what makes this dessert a lasting favorite. By respecting the folding cycles, using the right tools, and allowing each half to dry completely, you guarantee a professional-grade result every time. Your family will be completely delighted the moment you serve a batch of these chocolate and vanilla cookies recipe treats, revealing a beautifully soft, dual-flavored sweet that satisfies every single craving.
- Step 4Glaze the Dual Sides
Whisk your powdered sugar, vanilla, and hot water together to create a thick, spreadable white icing. Spread this glaze over exactly half of the flat bottom of each cooled cookie. Once set, stir your cocoa powder and a tiny splash of extra water into the remaining icing, then coat the second half beautifully.
Troubleshooting Your Chocolate and Vanilla Cookies Recipe
Whole milk provides the ideal fat and protein balance to give these cookies their signature soft, cake-like texture. Using water or thin non-dairy alternatives can result in a flatter, drier cookie that lacks richness.
Ensure your powdered sugar base is thick enough to hold its shape—it should resemble thick, slow-flowing lava. If it seems too thin, simply whisk in an extra tablespoon of powdered sugar until it holds its form smoothly.
Soft Black and White Cookies
Course: DessertsCuisine: American14
Cookies25
minutes12
minutes37
minutesThis traditional chocolate and vanilla cookies recipe features a soft, cake-like sponge base topped with a high-gloss, half-vanilla and half-chocolate icing.
Ingredients
1/2 cup (approx. 115g) unsalted butter, softened
1 cup (approx. 200g) granulated white sugar
2 large eggs, room temperature
1 teaspoon pure vanilla extract
2 cups (approx. 250g) all-purpose flour
1/2 teaspoon baking powder
1/4 teaspoon fine sea salt
1/3 cup whole milk
3 cups (approx. 360g) powdered sugar (for glaze)
3 to 4 tablespoons hot water
3 tablespoons (approx. 22g) unsweetened cocoa powder
Directions
- Preheat your oven to 350°F (175°C) and line a large baking sheet with fresh parchment paper.
- In a large mixing bowl, combine the softened unsalted butter and white granulated sugar. Beat with an electric mixer on medium-high speed for 3 minutes until pale and fluffy.
- Add the room-temperature eggs one at a time, beating well after each addition, then mix in the pure vanilla extract.
- In a separate bowl, whisk together the all-purpose flour, baking powder, and fine sea salt.
- With the mixer on low speed, add the dry ingredients alternately with the whole milk in small batches, starting and ending with the flour mixture. Mix just until combined into a thick, smooth batter.
- Use a standard cookie scoop to drop 14 uniform mounds of batter onto your prepared baking sheet, keeping them 2 inches apart.
- Dampen your fingertips slightly with clean water and gently flatten the tops of the batter mounds into even, flat disks.
- Bake on the center rack for 10 to 12 minutes, until the outer rims are completely matte and set, but the tops remain pale and soft to the touch.
- Remove from the oven and let the cookies sit on the hot pan for 5 minutes before transferring them upside down onto a wire rack to cool completely.
- To make the glaze, whisk the powdered sugar, a teaspoon of vanilla extract, and 3 tablespoons of hot water together in a bowl until a thick, glossy icing forms.
- Flip the cooled cookies so the flat bottoms face upward. Spread the smooth white vanilla glaze over exactly one-half of each cookie bottom, then let them sit for 15 minutes to dry.
- Whisk the unsweetened cocoa powder and an extra tablespoon of hot water directly into the remaining white glaze until smooth. Spread the rich chocolate icing over the second half of each cookie and let set before serving.
Notes
- Glaze Consistency: The icing should be thick enough to stay firmly on the cookie without running down the sides. If it is too thin, add a bit more powdered sugar.
- Storage: Keep leftover glazed cookies stored in a single layer inside a sealed container at room temperature for up to 3 days.